 NexScrm官方博客
If your LINE Official Account serves customers in Thailand, Japan, Taiwan, and English-speaking regions, and you want each person to see a menu they can understand at the bottom of the chat, you can handle it in three ways:
- No development resources: Create a single menu image with bilingual or multilingual text.
- Development resources available, and you want customers to choose their own language: Use the Messaging API to create a separate menu for each language, add language-switch buttons to the menu, and let customers switch with one tap.
- Development resources available, and you want customers to see the right language immediately: Read the customer's phone language setting on the backend and automatically bind the corresponding language menu, while keeping switch buttons as a fallback.
Below, I'll first explain why the backend alone can't do this, then walk through the specific steps for each of the three approaches.
First, understand what the backend can do
The LINE Official Account Manager backend can only set one global default rich menu, with the option to schedule changes by time period. It cannot route and display different menus based on a friend's system language.
The action types available for buttons in the backend are also limited: link, text, coupon, loyalty card, and none. There is no "switch to another menu" option. So if you only work within the backend, the best you can do is have one menu serve multiple languages. To create true language-specific versions, you need the Messaging API.
Approach 1: Bilingual mixed layout in a single image (no coding required)
This approach suits accounts with only a few languages, such as mainly two languages like Chinese-English or English-Thai.
- Design the menu image: In the same image, label each button in both languages, e.g., "Order Status / 查询订单". With three or more languages, button text gets crowded easily, so it's better to add multilingual labels only to the most important entries and use icons for the rest.
- Configure button actions: For entries that need to redirect, use the "Link" action, and the landing page itself should ideally support language switching.
- Buttons that need auto-replies: Set the action to "Text". When tapped, it sends a fixed keyword as the customer, which is then caught by a keyword auto-reply. Write the auto-reply content in both languages so customers can understand it regardless of which language they use.
This approach has clear limits: the menu becomes information-dense, and each language can only be very brief. Once you have more languages, it's time to consider the next two approaches.
Approach 2: Add language-switch buttons to the menu (let customers choose)
This approach requires creating menus via the Messaging API. The key is to give each menu a "alias" (richMenuAliasId), then use the richmenuswitch action to jump between aliases.
- Create one menu per language. It's recommended that all language versions use the same layout and button area coordinates, changing only the text on the image and the links or replies tied to each button. Future updates then only require changing the image, which is much easier to maintain.
- Create an alias for each menu, e.g.,
menu-zh,menu-en,menu-th,menu-ja. - Reserve a language-switch area in each menu, such as a row of small tabs at the top: "中文|EN|ไทย|日本語". Set each tab's action type to
richmenuswitch, pointing to the corresponding language alias. - Choose one menu as the default, usually the language with the most customers, or English. Customers see this one first when they arrive, then switch themselves.
When a customer taps a switch button, the menu changes to the target language directly in the chat, without leaving and re-entering the chat, and without consuming the Official Account's push message quota. This approach suits accounts with a scattered and hard-to-predict customer language distribution.
Approach 3: Automatically bind menus based on phone language
This approach lets customers see a menu that matches their phone language right after adding you as a friend, and it requires backend programming.
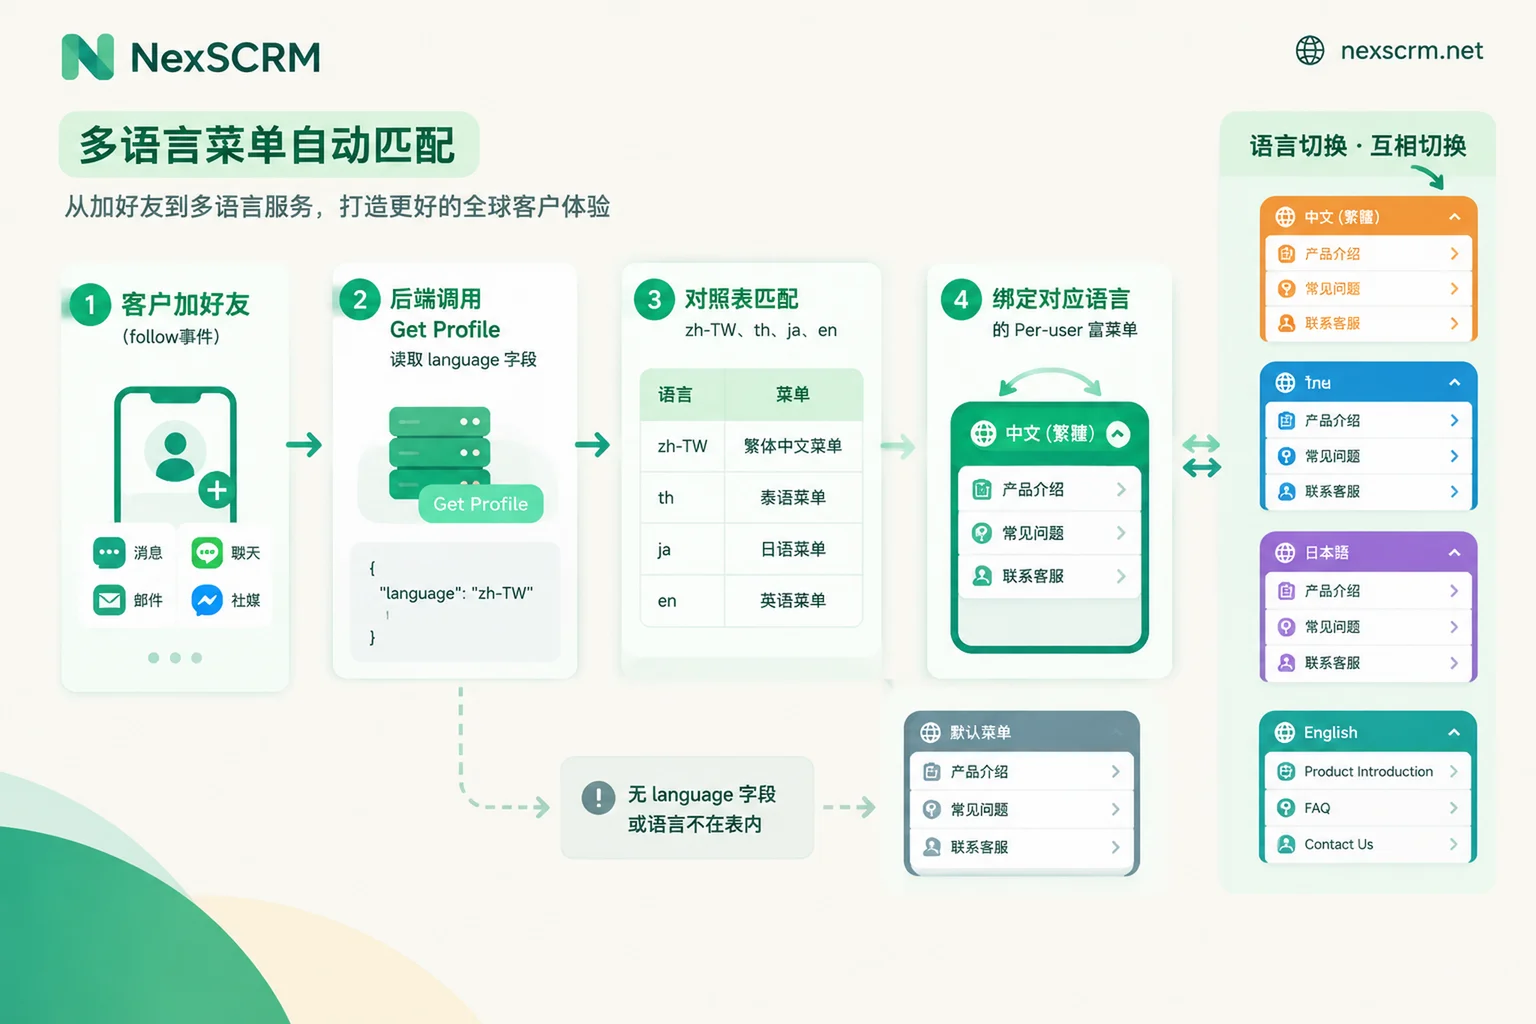
Here's the flow:
- Listen for the follow event: When you receive a customer's follow event, get their userId.
- Read the language: Call the Get Profile API
GET /v2/bot/profile/{userId}. Thelanguagefield in the response is the customer's system language, in BCP 47 format, e.g.,zh-TW,en,ja,th. - Map the language value to a menu: Maintain a mapping table in your program, e.g.,
zh-TWmaps to the Traditional Chinese menu,thto the Thai menu,jato the Japanese menu. For languages not in the table, and cases where thelanguagefield is missing from the response, skip binding entirely so the customer sees the default menu. - Bind the menu individually for the customer: Call
POST /v2/bot/user/{userId}/richmenu/{richMenuId}to bind the corresponding language menu to that customer.
Three things to note:
- Display priority: A menu bound to a specific customer (Per-user) takes priority over the global default menu. So the default menu can safely serve as a fallback and won't override customers already bound by language.
- Existing friends who already added you won't trigger the follow event again. You can apply the same binding flow when they send their first message or tap a button.
- The phone language doesn't always match the language the customer wants to use. For example, a Chinese person working in Thailand may have their phone set to English. So it's still recommended to keep the language-switch buttons from Approach 2 in every menu, letting customers change it themselves.
In practice, combining Approach 3 with the switch buttons from Approach 2 is a solid setup: most customers see the right language immediately, and the few whose language can't be determined accurately can switch themselves.
Check image specifications and display environments before launch
- Image specifications: For large (full) size, 2500×1686 px is recommended; for small (half) size, 2500×843 px. Use JPEG or PNG, and each image must not exceed 1 MB. Thai and Japanese glyphs are complex and can blur after compression, so it's best to check the exported image on an actual phone.
- Rich menus don't show on desktop: Rich menus only appear at the bottom of the chat in the iOS and Android versions of LINE; they are not visible on Windows or macOS desktop versions. Customers using the desktop version will miss all menu entries, so core entry points like ordering, customer service, and language selection should also be included as text guidance in the welcome message or auto-replies. For tips on writing welcome messages, see What to send as the first message after a friend adds your LINE Official Account.
- Test on phones set to different languages: Set the test phone's system language to each target language, re-add the account with a test account, and check that binding is correct, that switch buttons toggle back and forth, and that each button's link points to the page in the corresponding language.
- Review data by language: Once the menu is split into multiple language versions, it's best to review click data per version so you can see which language's entries nobody taps. For how to collect this data, see How to measure LINE rich menu click-through rates.
After customers tap through from the menu into a chat
A multilingual menu solves the problem of "customers being able to find the entry point." After a customer taps "Contact Support" or "Get a Quote," they enter a one-on-one chat where your support team may simultaneously receive Thai text, Japanese voice messages, or screenshots with foreign text—the pressure on support is much greater than setting up the menu itself.
If your team manages multiple LINE accounts, you can use the NexSCRM Windows client to send and receive messages across all of them in one workspace. Its real-time two-way translation supports text, images, and voice, with multiple translation engines to choose from, and it keeps both the original and translated text in the conversation, making it easy for support to verify the original meaning and to keep records during handovers. For feature details, see the real-time translation feature page. Pricing per port and the free trial entry point are on the pricing page. You can start by testing the support workflow with one multilingual LINE account.


Comments(0)